Data Sources
Data sources connect Arcane to where your traces are stored. You need at least one data source configured before you can search Traces or Conversations. Choose which data source to use when searching.
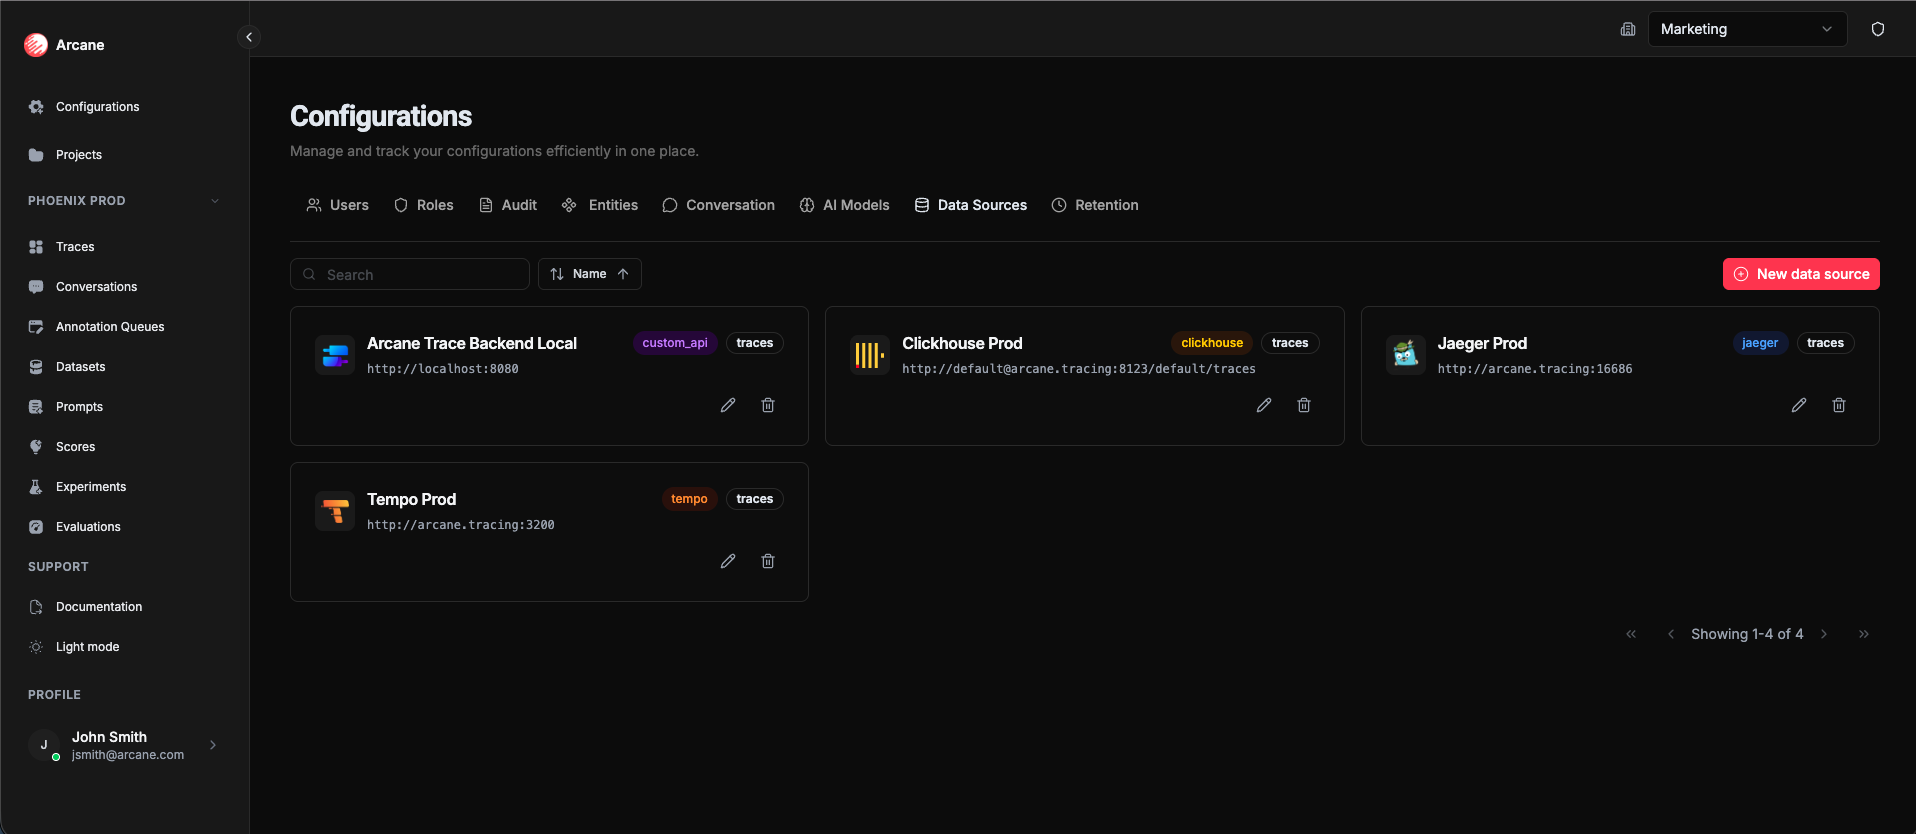
What you see
The Data Sources tab shows cards for each configured data source:
| Element | Description |
|---|---|
| Data source cards | Each card shows name, type (ClickHouse, Jaeger, Tempo), URL, Edit, and Delete buttons |
| Search | Filter data sources by name |
| New data source | Button to open the New Data Source dialog |
Creating a data source
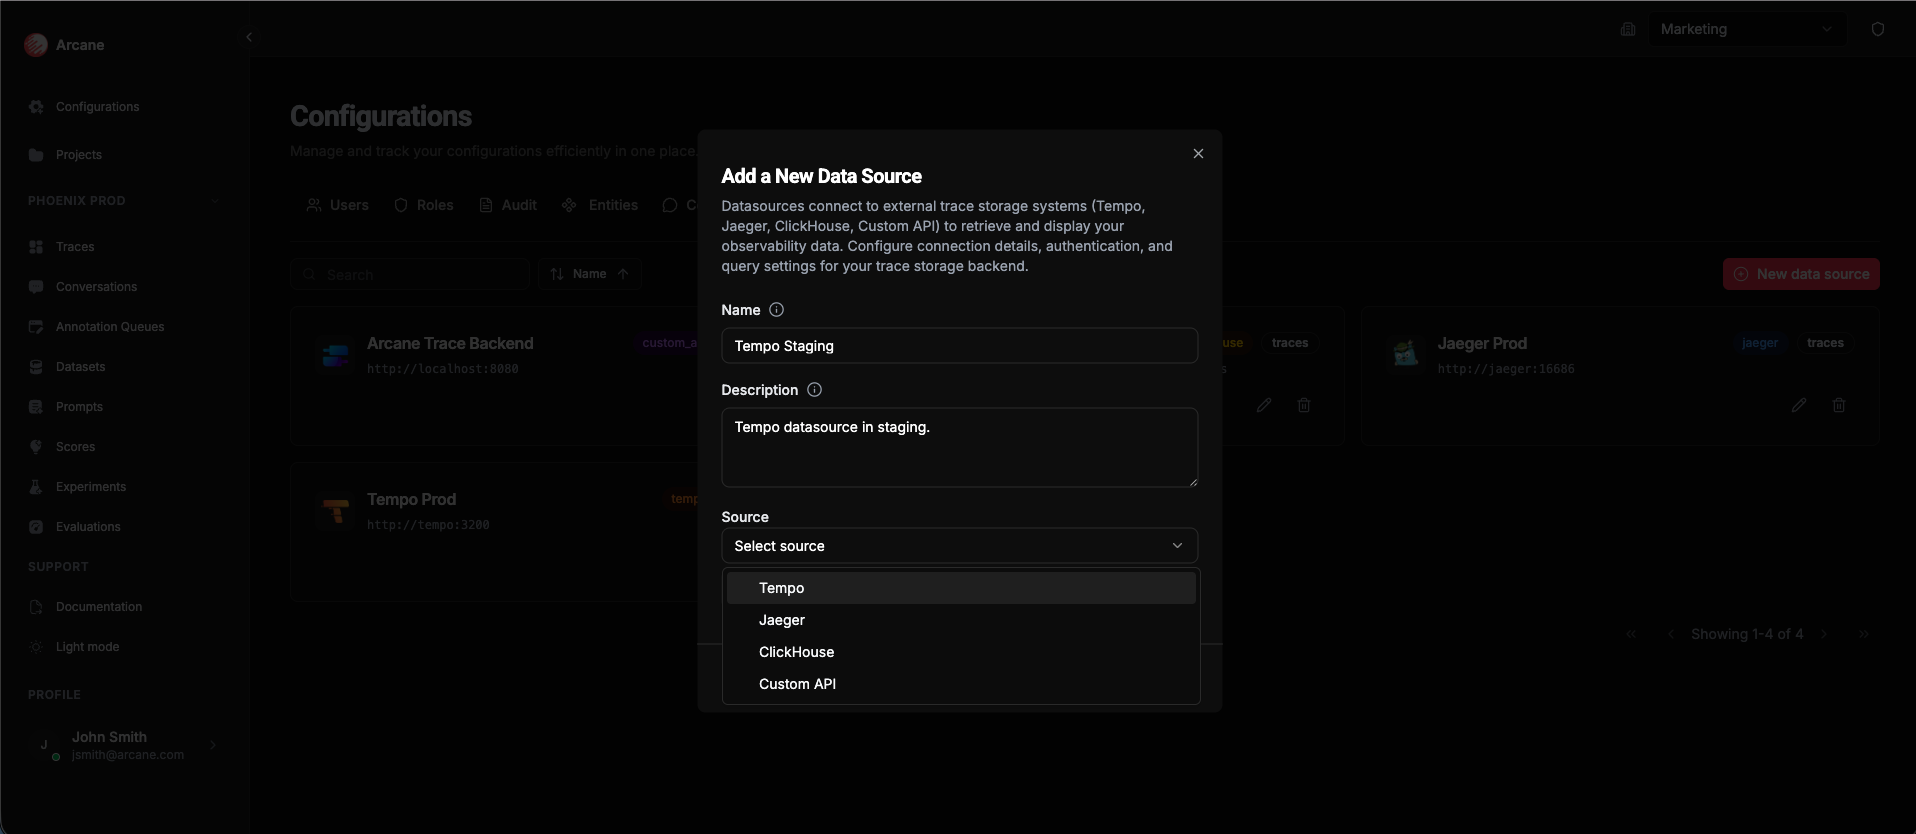
Click New data source to add a connection to your trace backend.
New Data Source dialog
| Field | Required | Description |
|---|---|---|
| Name | Yes | A friendly name for this data source (e.g., "Clickhouse Prod", "Jaeger Staging") |
| Description | No | Optional description to help your team understand what this data source is for |
| Source | Yes | Choose the type: Tempo, Jaeger, ClickHouse, or Custom API. After selecting, connection fields appear based on the type |
Buttons: Cancel closes without saving. Create Data Source creates the connection.
Test Connection: After configuring your datasource, use the Test Connection button to verify Arcane can reach your backend with the configured settings. This helps catch connection and authentication issues before saving.
Tip: Use descriptive names that indicate the environment (e.g., "Prod", "Staging") or purpose. This makes it easier to choose the right data source when searching traces. Always test the connection before saving to avoid troubleshooting issues later.
Supported backends
Arcane supports these trace backends:
- Tempo — Grafana's tracing backend. Great for large volumes and TraceQL queries.
- Jaeger — Mature tracing backend. Works with OTLP and multiple storage backends.
- ClickHouse — Columnar database used as a trace store. Good for analytics and large-scale deployments.
- Custom API — Any backend that exposes traces in OpenTelemetry format. Your backend must follow the Custom API OpenAPI specification to work with Arcane.
Creating each datasource type
After selecting a datasource type in the Source dropdown, different fields appear based on your choice. Here's what you need to configure for each type:
Tempo
Tempo is Grafana's tracing backend. It's great for large volumes and TraceQL queries.
Configuration:
| Field | Required | Description |
|---|---|---|
| URL | Yes | The URL where your Tempo instance is accessible (e.g., http://localhost:3200 or https://tempo.example.com) |
| Authentication | No | Optional authentication. Choose from: None, Basic Authentication (username/password), or Bearer Token |
Authentication options:
- None — No authentication required
- Basic Authentication — Username and password
- Bearer Token — Bearer token authentication
Test Connection: Click Test Connection to verify Arcane can reach your Tempo instance with the configured URL and authentication. This helps catch connection issues before saving.
Tip: Use the test button to verify connectivity and authentication before saving. This saves time troubleshooting connection issues later.
Jaeger
Jaeger is a mature tracing backend that works with OTLP and multiple storage backends.
Configuration:
| Field | Required | Description |
|---|---|---|
| URL | Yes | The URL where your Jaeger instance is accessible (e.g., http://localhost:16686 or https://jaeger.example.com) |
| Authentication | No | Optional authentication. Choose from: None, Basic Authentication (username/password), or Bearer Token |
Important: Arcane is only compatible with Jaeger's Query v3 API. Make sure your Jaeger instance supports the Query Service v3 API. Older versions of Jaeger will not work because Query v3 is the only API that exposes traces in OpenTelemetry format.
Authentication options:
- None — No authentication required
- Basic Authentication — Username and password
- Bearer Token — Bearer token authentication
Test Connection: Click Test Connection to verify Arcane can reach your Jaeger instance with the configured URL and authentication. This helps catch connection issues before saving.
Tip: Use the test button to verify connectivity and authentication before saving. Jaeger typically runs on port 16686 for the query service. Make sure you're pointing to the correct endpoint and that your Jaeger version supports the v3 API.
ClickHouse
ClickHouse is a columnar database used as a trace store. It's good for analytics and large-scale deployments.
Configuration:
| Field | Required | Description |
|---|---|---|
| Host | Yes | The ClickHouse server hostname or IP address (e.g., localhost or clickhouse.example.com) |
| Port | No | The ClickHouse HTTP port (default: 8123) |
| Database | Yes | The database name where traces are stored (e.g., default or traces) |
| Table Name | Yes | The table name where traces are stored (e.g., traces or otel_traces) |
| Protocol | No | Choose HTTP or HTTPS (default: HTTP) |
| Username | No | ClickHouse username (default: default) |
| Password | No | ClickHouse password (leave empty if no password) |
| URL (Alternative) | No | Optional: Use a full URL instead of individual fields for backward compatibility (e.g., http://localhost:8123/default?table=traces) |
Tip: You can either fill in the individual fields (Host, Port, Database, etc.) or use the URL field. The URL field is useful for backward compatibility with existing configurations.
Test Connection: Click Test Connection to verify Arcane can connect to your ClickHouse instance with the configured settings. This helps catch connection and authentication issues before saving.
Custom API
Custom API lets you connect to any backend that exposes traces in OpenTelemetry format. Your backend must follow the Custom API OpenAPI specification.
Configuration:
| Field | Required | Description |
|---|---|---|
| Base URL | Yes | The base URL of your custom API (e.g., https://api.example.com) |
| Search Endpoint | Yes | The path for searching traces (e.g., /api/v1/traces/search) |
| Search by Trace ID Endpoint | Yes | The path for searching by trace ID (e.g., /api/v1/traces/{traceId}) |
| Capabilities | Yes | Check which features your API supports: search by query, search by attributes, filter by attribute exists, get attribute names, get attribute values |
| Authentication | No | Optional authentication configuration (API key, Bearer token, etc.) |
| Headers | No | Optional custom headers to send with requests |
Important: Your backend must implement the endpoints specified in the Custom API OpenAPI specification. Review the specification to ensure your API is compatible.
Tip: Start with the required endpoints (Search and Search by Trace ID). You can enable additional capabilities later if your API supports them.
Editing a data source
Click Edit on a data source card to change its name, description, URL, or connection settings.
Deleting a data source
Click Delete on a data source card to remove it. This prevents you from searching that backend, but doesn't delete any trace data.
Note: Make sure no one is actively using a data source before deleting it. Users searching traces will need to switch to a different data source.
When to use
- Initial setup — Add your first data source when getting started with Arcane
- Multiple environments — Create separate data sources for production, staging, and development
- Different backends — Add multiple data sources if you use different trace backends for different services
- Testing — Create a test data source to experiment without affecting production searches
Tips
- Test connectivity — Make sure Arcane can reach the backend URL before creating the data source
- Use clear names — Name data sources so it's obvious which environment or service they connect to
- One per environment — Use one data source per environment to keep searches clear and avoid confusion
Related
- Traces — Search traces using your data sources
- Conversations — View conversations from your data sources
- Organisation Configuration — Overview of all organization configuration options